How to setup Free Pascal for Nintendo DS
Date de publication : 22/01/2010 , Date de mise à jour : 28/01/2010
Par
Jules AKAPO-TOULAN
|
This tutorial describes an easy way to install and configurate FPC4NDS (Free Pascal Compiler for Nintendo DS) on Linux and Windows.
|
7 commentaires  |
I. Introduction
II. Installation and configuration
II-A. On Linux
II-A-1. Creating the installation directories
II-A-2. Installing devkitARM
II-A-3. Installing libnds
II-A-4. Installing default_arm7
II-A-5. Installing fpc4nds
II-A-6. Modifying .bashrc
II-A-7. Creating .fpc.cfg
II-B. On Windows
II-B-1. Creating the installation directories
II-B-2. Installing devkitARM
II-B-3. Installing libnds
II-B-4. Installing default_arm7
II-B-5. Installing fpc4nds
II-B-6. Adding environment variables
II-B-7. Creating fpc.cfg
III. Compiling and running
III-A. Compiling and running on Linux
III-B. Compiling and running on Windows
III-C. Brief explanation
III-D. Using an emulator
IV. Conclusion
Useful links
Acknowledgements
I. Introduction
After my discovery of FPC4NDS, which is a development environment used to build applications for the Nintendo DS (NDS) platform, I wanted to share an easy way to set it up.
At the end of all setup instructions, we will create a small example program.
Before deploying them on a real Nintendo DS, you will need an NDS emulator in order to test your programs.
Here are some emulators that you can download :
To program with FPC4NDS, it is required to have strong experience with the Pascal language.
 |
The successive steps of installation and configuration of Free Pascal for NintendoDS have been successfully tested on the following platforms : Linux Ubuntu 9.10, Mandriva 2008.0, Windows 2000, Windows XP and Windows Vista.
|
II. Installation and configuration
To setup the Free Pascal for Nintendo DS environment you'll need :
II-A. On Linux
II-A-1. Creating the installation directories
You must choose now in which directories the different components will be installed.
In our case, we have chosen the /opt directory, where we created two subdirectories : devkitPro and fpc4nds.
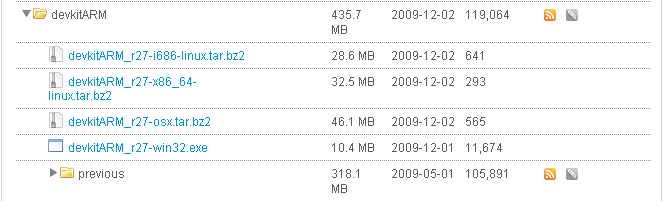
II-A-2. Installing devkitARM
1. Go to the
devkitPro directory;
2. Create a new subdirectory named
devkitARM;
3. Download the
devkitARM
package for your Linux distribution :
4. Extract the package into the devkitARM directory.
II-A-3. Installing libnds
Create the
libnds directory in
devkitPro.
Download the
libnds-1.4.0.tar.bz2
package and extract it into the
libnds directory.
II-A-4. Installing default_arm7
II-A-5. Installing fpc4nds
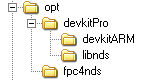
Here is the complete treeview of /opt now :
II-A-6. Modifying .bashrc
Add the following lines to the .bashrc file :
export PATH=/opt/fpc4nds/bin/arm-nds:$PATH
export DEVKITPRO=/opt/devkitPro
export DEVKITARM=$DEVKITPRO/devkitARM
|
II-A-7. Creating .fpc.cfg
Now let's create the configuration file necessary to run the execution environment.
Create the .fpc.cfg in your home directory (/home/[user]/) and paste the following content into it :
-Tnds
-XParm-eabi-
-Fu/opt/fpc4nds/units/arm-nds
-FD/opt/fpc4nds
-FD/opt/fpc4nds/lib
-Fu/opt/fpc4nds/units/arm-nds/libndsfpc
-FD/opt/fpc4nds/bin/arm-nds
-Fl/opt/devkitPro/libnds/lib
-Fl/opt/devkitPro/devkitARM/lib/gcc/arm-eabi/4.4.2/thumb
-Fl/opt/devkitPro/devkitARM/arm-eabi/lib/thumb
-Fl/opt/devkitPro/devkitARM/lib/gcc/arm-eabi/4.4.2
-Fl/opt/devkitPro/devkitARM/arm-eabi/lib
|
II-B. On Windows
II-B-1. Creating the installation directories
As explained previously in the Linux chapter, choose the directory in which all the components will be installed.
Let's choose the root C:\ and create two subdirectories named devkitPro and fpc4nds.
II-B-2. Installing devkitARM
1. Go to the
devkitPro directory;
2. Create a new subdirectory named
devkitARM;
3. Download the
devkitARM
package for Windows;
4. Extract the package into the devkitARM directory.
II-B-3. Installing libnds
Create the
libnds directory in
devkitPro.
Download the
libnds-1.4.0.tar.bz2
package and extract it into the
libnds directory.
II-B-4. Installing default_arm7
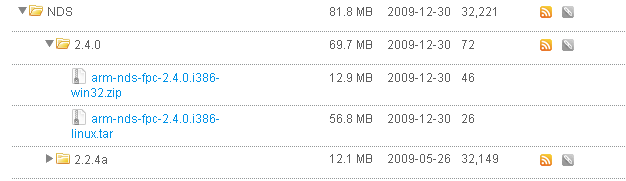
II-B-5. Installing fpc4nds
The next step is the content of the
fpc4nds directory.
Choose the newest package, i.e.
arm-nds-fpc-2.4.0.i386-win32.zip
.
Extract it into the
fpc4nds directory :
Here is the complete treeview of C:\ now :
+C\(root)
|____+devkitPro
     |_____+devkitARM
     |_____+libnds
           |______... other files and directories ...
           |______default.elf
           |______default.arm7

|____+fpc4nds
     |_____+units
     |_____+bin
     |_____+msg
     |_____+[examples]
|
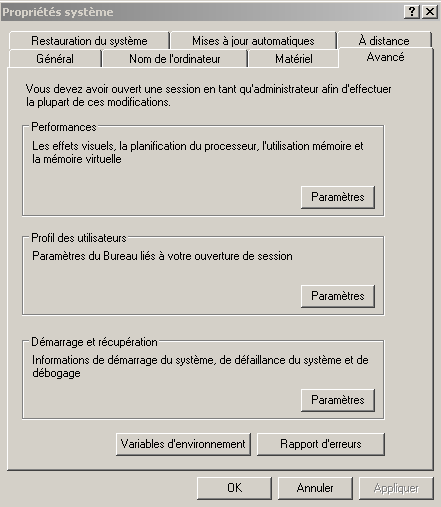
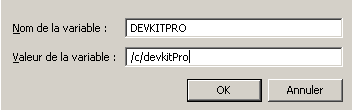
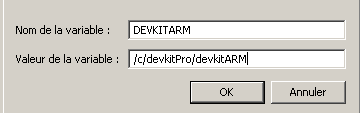
II-B-6. Adding environment variables
Now let's create two environment variables : DEVKITPRO and DEVKITARM.
On your desktop, right-click on My Computer, choose Properties and go to sheet Advanced :
Click on New to create two system environment variables named DEVKITPRO and DEVKITARM :
II-B-7. Creating fpc.cfg
The configuration file used for running the sources for the Nintendo DS platform must be similar to this :
-Tnds
-XParm-eabi
-FuC:\fpc4nds\units\arm-nds
-FuC:\fpc4nds\units\arm-nds\libndsfpc
-FDC:\fpc4nds
-FDC:\fpc4nds\bin\arm-nds
-FlC:\devkitPro\libnds\lib
-FlC:\devkitPro\devkitARM\lib\gcc\arm-eabi\4.4.2
-FlC:\devkitPro\devkitARM\lib\gcc\arm-eabi\4.4.2\thumb
-FlC:\devkitPro\devkitARM\arm-eabi\lib
-FlC:\devkitPro\devkitARM\arm-eabi\lib\thumb
|
Create the fpc.cfg file in the C:\fpc4nds\bin\arm-nds directory and paste in this file these previous lines.
III. Compiling and running
The environment is now completely set up and you can write your first NDS program.
In order to help you in that task, there are some examples in the fpc4nds directory.
Let's compile and run our "Hello world".
In the fpc4nds/examples directory, create a new subdirectory named my_first_program.
In that directory, create the file helloworld.pp with the following code :
program helloworld;
uses nds9;
begin
consoleDemoInit();
printf('Hello World !!!');
end.
|
III-A. Compiling and running on Linux
To compile the source file, go to the my_first_program directory and enter the following command to invoke the right compiler :
krachik@kraserver:/opt/fpc4nds/examples/my_first_program$ /opt/fpc4nds/bin/arm-nds/ppcarm helloworld.pp
Nintendo DS rom tool 1.46 - Dec 2 2009
by Rafael Vuijk, Dave Murphy, Alexei Karpenko
|
 |
If the compiling process fails, make sure you have execution rights on the helloworld.pp file.
|
III-B. Compiling and running on Windows
To compile the source file, go to the my_first_program directory and enter the following command :
C:\fpc4nds\examples\my_first_program>C:\fpc4nds\bin\arm-nds\ppcarm.exe helloworld.pp
Nintendo DS rom tool 1.46 - Nov 30 2009
by Rafael Vuijk, Dave Murphy, Alexei Karpenko
|
III-C. Brief explanation
The consoleDemoInit() function initializes the Nintendo DS console screen for display.
To use this function, you need to declare the nds9 unit in the uses section.
To display a text you can use printf or iprintf.
The Nintendo DS runs applications compiled for the ARM7 or ARM9 platforms.
If the whole process succeeds, *nef.bin, *.nds and *.nef files are created.
If no target platform is mentioned, the default environment setting is {$apptype arm9}.
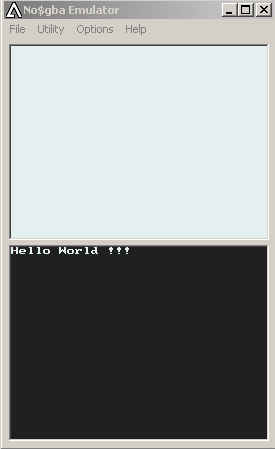
III-D. Using an emulator
You need an NDS emulator to test the program you've just compiled.
See the emulator list above.
Let's choose for example the No$gba emulator : you only need to run NO$GBA.EXE and to load the helloworld.nds file.
Here is the result :
IV. Conclusion
In this tutorial you learned how to install and configure your environment to create and run applications for the Nintendo DS.
Depending on the applications you are planning to create, you will need libraries that can be downloaded with the same URL as devkitPro (dswifi, libfat, a.s.o).
Notice that you can also run the NDS emulators on Linux with wine.
Useful links
Acknowledgements